Thursday, December 9, 2010

Cookie Monster

Christmastime in the Miller household = Cookies. Lots-n-lots of Cookies. I started making & freezing cookie dough 2 weeks ago in preparation. The upside? No cookie frenzy 2 or 3 days before Christmas day like in past years. The downside? I can't find room in the freezer for actual FOOD. Ah, well. Sacrifices must be made for the greater good.

What are some of your favorite cookie recipes? Here are a few of my standbys. I try to add in a few newbies every year, but there are some that I am faithful t
o.

Classic Spritz Cookies (Mom got me this cookie press for my b-day. It's awesome!)


Hazelnut Butter Balls (Almost like a truffle, but easier.)
1 1/2 C Nutella spread
24 cinnamon graham cracker squares, crushed
1 cup pwd sugar
1 tbsp whipping cream
12 ounces
semisweet baking chocolate,chopped
2 tsp shortening
2 tbsp finely chopped toasted hazelnuts(opt)

line baking sheet with waxed paper; set aside
beat nutella and crushed graham crackers in a lrg mixing bowl with electric mixer until combined.Gradually stir in pwd sugar.Stir in whipping cream to make stiff mixture.Shape mixture into 1 inch balls;place balls on baking sheet.Chill for about an hour.

Cook and stir chocolate and shortening in med saucepan over low heat until melted and smooth.Remove from heat.Quickly dip balls, one at a time into melted chocolate and place back on baking sheet with waxed paper.Roll in hazelnuts if desired.Chill until set.Store in fridge.Makes 54 balls.


What are your holiday baking standbys? Please share!


Next time on The Humble Homemaker: Remember this epic fail? Strides have been made. Oh yes.

Sunday, November 21, 2010

End of November Daybook

Outside my window: It's dark, windy, and rainy. I kinda like it :)

I am listening to: The wind rattle the windows and baby Margaux making sweet baby noises in my lap.

I am wearing: Green long sleeve shirt, grey sweats, purple slippers.

I am thankful for: Today. Family. Everything.

I am thinking about: The beginning of Advent and Christmas! Mostly all the cool stuff I get to make during the holiday season. Also, trying to find a happy balance between keeping the TRUE meaning of Christmas at the front of our minds and...well, toys.

I am reading: Grace Cafe: Serving up Recipes for Faithful Mothering by Donna-Marie Cooper O'Boyle

From the Kitchen: Nada. Today we went to Mass, ate a big lunch out, and then went grocery shopping. Didn't get home til 4:30pm and we were all still full from lunch!

In the Learning House: We're taking the week off for Thanksgiving. Ahhh the joys of homeschooling :)

Living the Liturgical Year: We bought our Advent candles today.

I am Creating: Lots. Knitting a purple scarf for myself and crocheting bunches and bunches of little roses for Christmas Rosaries for the wee ones :) I also have several random unfinished projects going...as usual.

A few plans for the rest of the week: Turkey, turkey, turkey. Lots of it. Along with pie!

One of my favorite things: The quiet. amen.


Thursday, November 11, 2010

Seasonal Yumminess

I like cooking with the seasons. It's often cheaper because you can find it all at local farmer's markets...and it just helps me get in the mood. I'm a subscriber to Mother Earth News magazine and these 3 recipes were all in their October/November issue. And they were all delicious! Plus they got extra brownie points with me because all three are chock full o' veggies...and my kids still chowed down!! Score!


Butternut Squash Lasagna

Ingredients:

1 tbsp olive oil

1 (11⁄2- to 2-pound) butternut squash, peeled, seeded and cut into 1-inch cubes

Salt and freshly ground black pepper
1/2 cup water1/4 cup butter
1/3 cup all-purpose flour
4 cups whole milk
Pinch of nutmeg12 no-boil lasagna noodles
21⁄2 cups shredded mozzarella cheese
1/3 cup Parmesan cheese, grated

Instructions:

Heat oil in a heavy, large skillet over medium heat. Add the cubed squash and toss to coat. Sprinkle with salt and pepper. Pour the water into the skillet, cover and simmer over medium heat until the squash is tender, about 20 minutes. Transfer the squash to a mixing bowl or food processor and mash. Season the squash purée to taste with more salt and pepper.

Melt the butter in a medium-size saucepan over medium heat. Add flour and whisk for 1 minute. Gradually whisk in the milk. Bring to a low boil over medium- high heat. Reduce the heat to medium and simmer until the sauce thickens slightly, whisking often, about 5 minutes. Add the nutmeg. Season the sauce with salt and pepper to taste.

Preheat the oven to 375 degrees Fahrenheit. Lightly butter a 13-by-9-by-2- inch glass baking dish. Spread 3/4 cup of the sauce over the prepared baking dish. Cover the bottom of pan with one layer of lasagna noodles. Spread half of the squash purée over the noodles. Sprinkle with 1/2 cup of mozzarella cheese. Drizzle 1/2 cup of sauce over the cheese. Repeat layering once more, finishing with a layer of noodles covered only by white sauce.

Tightly cover the baking dish with foil and bake for 40 minutes. Remove cover, sprinkle the remaining mozzarella and Parmesan cheeses over the lasagna and continue baking until the sauce bubbles and the top is golden, about 15 minutes longer. Let the lasagna stand for 15 minutes before serving. Serves 8.


Caldo Verde (Portuguese style Kale & Potato Soup)

Ingredients:

1/4 cup olive oil
1 large Spanish onion, diced
2 cloves garlic, sliced
1 spicy sausage, sliced
6 medium boiling potatoes, peeled and diced
10 cups water
1 pound kale leaves, stalks removed, julienned very fine
Salt and pepper to taste

Instructions:

In a sto

ckpot, heat the olive oil over medium heat. Add the onions and garlic and cook until soft and translucent. In a frying pan, cook the sausage, slice it and set aside for later. Add the potatoes to the stockpot and cover with water. Bring to a boil and lower the heat, simmering until the potatoes are almost done, about 15 minutes. Remove the pot from the heat and crush some of the potatoes using a potato masher or wooden spoon to thicken the broth. Return the pot to the heat and bring to a boil. Add the greens and simmer for 2 minutes. Season with salt and pepper, ladle into bowls, and garnish with sausage. Serves 8.


Carrot Apple Nut Muffins

Ingredients:

1/2 cup walnuts or pecans, chopped
2 cups raw carrots (about 2 or 3 carrots)
1 large apple
2 cups all-purpose flour
1 cup sugar (brown, white or a combination)
3/4 tsp baking soda
11⁄2 tsp baking powder
1/2 tsp salt
1/2 tsp ground cinnamon
3 large eggs
3/4 cup vegetable oil
1/2 tsp fresh ginger, grated
1 tsp pure vanilla extract

Instructions:

Preheat oven to 350 degrees Fahrenheit. Grease muffin cups or insert liners, if using. Peel and finely grate the carrots and apple, setting aside for later.

In a large bowl, whisk together the flour, sugar, baking soda, baking powder, salt and ground cinnamon. Stir in the nuts. Set aside.

In a separate bowl, whisk together the eggs, oil, ginger and vanilla extract. Fold the wet ingredients and the grated carrot and apple into the flour mixture, stirring just until moistened. Divide the batter evenly between the prepared muffin cups and bake for 20 to 25 minutes or until a toothpick inserted in the center comes out clean. Remove from oven and let cool on a wire rack. Makes 9 standard-size muffins or 12 small ones.


Bon Appetit!


Tuesday, October 26, 2010

Baby News!!!


Margaux Alexandria has arrived!!!
Born October 23, 2010 at 10:37pm
weighing 8lbs 7oz, 20 inches long
(excuse the fuzzy cellphone picture!
I haven't had a chance to upload pics from the camera yet)

"I prayed for this child, and the Lord has granted me what I asked of him." 1 Samuel 1:27

Friday, October 22, 2010

Let's talk Holidays.


It's almost that time of year again!! I come from a pretty small family, but my husband has around 80-ish cousins and a whole lotta aunts and uncles. He's the youngest of four and so we also have a lot of nieces and nephews. For the sake of my sanity (and bank account), I start thinking about the holidays pretty early. Whenever possible, we do homemade/handmade gifts. I think it's great for the kids...but it's also good for the grown ups too. With a little planning ahead, it's really quite easy and can be a lot of fun!

Below are a list of ideas of fun and affordable handmade/homemade gifts...some of which the kids can even get in on!!

1. Know how to knit or crochet? Check out www.ravelry.com for tons of cute patterns...and they're free! That's the route we're taking this year. Adults are getting crocheted washcloths that can be used as rags, hot plates, dish cloths...whatever they need them for. Kids are getting matching hats and mittens.

2. Candles! I found some really easy instructions on how to make some pretty candles.

3. Hot Cocoa Mix. Put this in a cute mug and you're good to go!

4. Soap Balls! I remember doing this when I was little and it went over really well.

5. Sock Puppets (for kids, of course)

6. No Sew Sachets (Kid friendly)

7. Adorable Pin Cushions

8. Awesome Storage Bins (some sewing skills required)


Have some ideas to share? I'd love to hear what other families do for homemade Christmas gifts!


Monday, October 18, 2010

A woman of her word!

So, here I am, 9 months pregnant with Baby number 3. 38 weeks to be exact! It's a girl!! Margaux Alexandria. We had some complications (hence my absenteeism), but things have been smooth sailing for the last 8 weeks or so and I'm ready to jump back into the Humble Homemaker!

So, if I remember correctly, I owe you all some pictures! Laundry detergent making process pictures! My last batch lasted 6 months (wow!). Since then we've moved into a new home with our own washer & dryer and in light of that, we've started cloth diapering. So detergent isn't lasting quite as long these days since I'm doing diaper laundry as well...but it costs .87 cents per batch of detergent, so who cares?!

First, a review of the Recipe:


1/3 bar of Soap grated or finely chopped. I've used Fels Naptha and Kirk's Castile soap, both work great!
1/2 cup Washing (NOT BAKING!) Soday
1/2 cup Borax
A whole lotta water
Big bucket (I use a 5 g
allon bucket)
Similar sized storage container (I use a few old laundry detergent containers)


Directions!

1. Combine grated soap and 6 cups of water in a medium saucepan. Heat until soap melts.

2. Stir in 1/2 cup Washing Soda and 1/2 cup Borax. Stir until dissolved.


After the soap, washing soda, and borax have dissolved, your mixture should look like this:


3. Add 4 cups HOT water to your bucket.


4. Pour in 1 gallon + 6 cups water (doesn't have to be hot) and your soap mixture. Let this sit in the bucket overnight and you're done! Use 1/2 cup detergent for top load washing machines and 1/4 cup detergent for front loaders.

A word on texture: A few friends & family have tried this recipe. Almost every single one of them called me saying that they must of done something wrong because their detergent looked like coagulated animal fat. Yes, this detergent has a weird texture...it gets chunky. Usually if you just shake it up a bit, it'll be fine. This doesn't have any impact on the functionality of the detergent, don't worry! If you're like my borderline OCD husband and REALLY can't stand the chunks, an emersion blender works fine to smooth it all out :).


Looking forward to many more posts!


Tuesday, April 20, 2010

Neglect!

Forgive me. I've been rather neglectful of this blog. Life, you know. News: We're Pregnant! Other News: Bed Rest- for now anyway. I promise I haven't forgotten about the blogosphere and I will have new things to write about...SOON!

Oh, and I still haven't had to make anymore laundry detergent. Yep, I've gone 4 months on 80-something cents of detergent. You'll just have to wait a little bit longer for those pictures! Seriously though...try it!

Friday, March 5, 2010

Another Disposable Fix

Since I started making my Homemade Disposable Baby Wipes ...I've started thinking about other possibilities for homemade disposable items around my house. The first thing that came to got me oh so excited. Meet my best friend:


Isn't she a beaut? Having 2 toddlers around the house (boys, nonetheless) makes for a lots of messes. After every single meal, no matter how unmessy I try to make it, my dining room floor is blotched and sprinkled with whatever was supposed to go in the boy's tummies. I found myself sweeping and mopping multiple times a day. Some people would suggest just doing a quick spot sweep/mop after meals and doing a good job of it after the day is over. This works for some people but I needed to find an alternative. And so the heavens opened up and out came this baby. The Swiffer Vac. She mops AND vacuums!!!!!!!!! Can you sense my excitement?? My floors have never been so clean :)

So the only problem with SwifferVac is the wet cloths that you use for the mop part. They work great...don't get me wrong. But Geesh! They're expensive! Even the store brand was $8.64 for 24 cloths! Since I use this thing 2-3 times a day, that was only going to last me a little over a week. I felt like it was worth it though, so I indulged.

Not anymore! By using the same concept as the Baby Wipes I'm now making my OWN refills. I've been using these for about a week now and barely notice a difference. Here's the Recipe!

Homemade SwifferVac Refills:
- 1 roll Bounty Papertowel (Bounty is the only brand strong enough for the job! Oh and make sure you don't get the kind that are perferated into thirds...you'll need 1 full sheet and the perferations will just make it tear easier while you're mopping)
-3 Cups Water
-1/2 Cup your favorite floor cleaner (I'm a Pine Sol gal)

Combine the water and cleaner. Place the WHOLE roll of paper towel into a large bowl & pour water mixture over it. Wait about 30 minutes and the cardboard center should be soft enough to pull right out. Use 1 paper towel the same as you would a typical refil cloth. I went to the dollar store and bought a storage container for these...just make sure it's long enough, about 13 inches.

As always, the price breakdown:

Store brand refills: $8.64 for 24= .36 each
Miller Brand Refills:
Bounty Papertowel: $1.41 for 54 sheets= .03
PineSol: $1 for 28oz= .03 (using 4oz for cleaning solution)= .12
Total: .15 each!


Happy Savings!

Sunday, February 28, 2010

Humble Homemaking Words to Live By

I long to accomplish great and noble tasks, but it is my chief duty and joy to accomplish humble tasks as though they were great and noble. ~Helen Keller

Sunday, February 21, 2010

Coming soon on high demand: Homemade Laundry Detergent

There has been a HUGE demand for Homemade Laundry Detergent. I've been holding off because as you can tell, I like to post step by step pictures of the process to help people along. The "problem" is that I made a batch 2 months ago and I'm not even a quarter of the way through it yet. I guess that's not really a "problem"...but it does pose an issue when my Laundry Detergent Container doesn't have enough room for another batch. That means I can't do pics...YET.


So I've decided to post JUST the recipe for now. I'll make another post to include pictures as soon as possible.


Here it is. The ever popular, insanely high in demand and biggest money saver to date:


Homemade Laundry Detergent (safe for front AND top load washers!)

Ingredients:

- 1/3 Bar Fels Naptha

- 1/2 Cup WASHING (not baking) Soda

- 1/2 Cup Borax

- Water

2 gallon Bucket for making

Similar sized container with a top for storage (I use an empty 150 oz Tide container)


Directions:

Grate soap & put in sauce pan. Add 6 cups water and heat until soap melts (stir as it melts). Add washing Soda & Borax and stir until it dissolves. Remove from heat. Pour 4 cups HOT water into the. Add soap mixture and stir. Now add 1 gallon + 6 cups water and stir. Let sit 24hours. It will gel up some but it won't be as thick as a store brand detergent...that's ok! Use 1/2 cup for a top load washer and 1/3 cup for a frong load washer.

*Optional: Add 1oz essential oil to scent. I did this with lavender oil and to be honest...it didn't add anything to the detergent and just drove up the cost (.5oz costs $7!!!). The fels naptha has a very nice scent to it so I don't bother with the oils anymore.


Cost Break Down

Tide

150oz Tide: $17.50 >.12cents per ounce> about 6oz per load > .70cents per load


Miller Brand:

Fels Naptha: $1.09 per bar > .36cents per batch

Washing Soda : $3.57 per 55oz box > .25cents per batch

Borax: $4.51 per 76oz box > .23cents per batch

Water: Free

Each Batch Costs .86cents to make.

Each Batch makes roughly 2.5 gallons of detergent (that's enough for 80-120 loads of laundry depending on if you're using a front or top loader)

END COST: .01-.007cents per load


Nuff said :)


I don't know about you-- but that gives me warm and fuzzy feelings


P.S. Since I'm not able to post pictures right now, feel free to leave comments with any questions you have!

Friday, February 19, 2010

Homemade DISPOSABLE Baby Wipes!

I've always been intrigued by the idea of homemade baby wipes. My only problem was that I needed them to be disposable. Since we are currently living in an apartment where each load of laundry costs $2, it wouldn't have been very economical for us to use cloth baby wipes. The money saved on wipes would have just been used on the added laundry! Finally I cam accross a great recipe for homemade DISPOSABLE baby wipes in the book "The Duggars: 20 and Counting!" I've been using this recipe for about 2 weeks now and I'm very happy with it. Not only are they easy to make but they are MUCH less expensive than the store brand wipes that I used to use. Try them out and tell me what you think!


Note:I was a little worried about the wipes drying out but thankfully this hasn't happened.


Recipe:

-1 Roll BOUNTY Paper Towels (this is the only brand that works- trust me! there are lots of coupons out there to make it even more worth your extra pennies)

-2 Cups Water

- 3-4 TBSP Baby Oil

- 1 TBSP Rubbing Alcohol.


Directions.

1. Cut the paper towl roll in half. Use an electric knife for best results. Place in large bowl.


2. In a small bowl mix water, rubbing alcohol & baby oil. Pour over paper towels.


3. Let sit for 30 mins. By this time the cardboard center should be soft enough for you to pull out.


4. Cut Paper Towel roll in 1/2 (Cut the roll at 12 0' clock and 6 o'clock...hope that makes sense). I recommend using an electric knife for this part too but mine is currently MIA.


5. Storage: I'm currently using a plastic wipes container from before. The Duggars use an empty 1 gallon ice cream container and cut a slit on the top. I'll try that out once my huggies container breaks and report back!


Enjoy!


Sunday, January 24, 2010

Taking a Moment to help those in Haiti


My Sister in Law sent me some information on an organization called "Feed My Starving Children"


Here's their "Mission Statement"


"Feed My Starving Children is a non-profit Christian organization committed to feeding God’s starving children hungry in body and spirit. The approach is simple: children and adults hand-pack meals formulated specially for starving children, and we ship the meals to more than 60 countries around the world."


From its beginnings, Feed My Starving Children (FMSC) has worked to develop a food mixture that would be easy and safe to transport, simple to make with only boiling water, and culturally acceptable worldwide.

With the input of scientists from major food companies in the Twin Cities area—including Cargill and General Mills—FMSC developed a formula consisting of:
1. Rice, the most widely accepted grain around the world.

2. Extruded soy nuggets, providing maximum protein at lowest cost.

3. Vitamins, minerals and a vegetarian chicken flavoring to give growing children the critical nutritional elements they need.

4. Dehydrated vegetables for flavor and nutrition.

Packaged in small pouches—each of which provides six highly nutritious meals—this easy-to-prepare food blend has won rave reviews all over the world. While the formula was designed to save the lives of severely malnourished and starving children, the ingredients also improve the health, growth and physical well-being of children who are no longer in immediate danger of starvation. A team of food scientists continues to monitor the FMSC formula to ensure that it meets nutritional needs for the world’s hungry children.
A single bag of food—which provides meals for six children—costs around $1 to produce


Every little bit helps! $30 will feed 3 children for 1 month. Even if you can only afford to donate $1...that's still 6 meals! Do what you can :)


Friday, January 22, 2010

Too Many Toys = Chaos

I don't know about you, but sometimes I just really have the feeling that my kids have too many toys. It probably crosses my mind the most when I'm struggling to get the boys down for their nap and it finally happens (Thank God!)...so then as I'm tip toeing down the hall trying to be stealthy as to not wake up my precious, although extremely cranky, 1 .5 yr old and 2.5 yr old toddlers when "SPEED? I AM SPEED? VROOOOOOOOOMMMMM!"
...That would be the sound of the Lighting MacQueen Shake 'n' Go speedracer car as I trip over it and send it racing down the hall.

"Mommy?! MacQueen?? I LOVE MACQUEEN!"

Yep. I just woke them up with my unfailing gracefulness. However I often can't help but to wonder if the "less is more" concept could very well be applied to our toy dilema. I've tried just about every toy organization unit on the market, we have 2 overflowing toy boxes and many skillfully stacked piles of toys throughout our 1,100 sq ft home. At any given time, the boy's bedroom floor may or may not be visible under a few dozen matchbox cars that "Not Me" dumped out, various stuffed animals and "toys" with so many bells & whistles that I'm convinced that the Toy Companies teamed up with Pharmaceutical Companies to drive moms crazy. You see, if they sell enough toys with enough noisemakers, Moms accross the world will have no choice but to buy some sort of medication to keep their sanity. I swear I can hear Elmo singing the alphabet in my sleep.

So we're trying something new. I went out and bought 4- 25 gallon plastic totaes. We left 1 toy box with some favorite toys in their bedroom and we're using the other toy box to store extra blankets and linen (this is also tackling our overcrowded linen closet- woohoo!). All the rest of toys go in these totes. I use a 3X5 card to label what's inside each tote and then we stack them up in the closet. If the boys get bored with what's in the toy box they can pull out ONE tote. However, before than can pull out another tote, the first one needs to be cleaned up and put away.
Today is our first day using this system. Surprisingly they haven't even noticed that 80% of their toys are no longer scattered all over. They're playing more quietly with the few favorites in the toy box, they're playing less destructively (no throwing, smashing etc.) and most impressively they're playing TOGETHER more. It's been a pretty quiet morning and as I look around my living room I am no longer struck with the yucky feeling that a toy store may have barfed all over my home.


I can see my floor...and I like it.


Humble Homemaking Words to Live By:

"To keep one's voice sweet, one's face bright, one's will steady, one's patience unperturbed, in the arena of the home, in the light of one's own family, is no light task" ~Margaret Sangster


Monday, January 18, 2010

Some Easy Peasy Recipes (Or as I like to call them, Pantry Cleaners and Wallet Savers)

These are 2 recipes that I use fairly often. I almost always have the ingredients on hand, they're delicious, and most importantly...they're cheap.


Mangia!!
Crockpot Shredded Chicken (serves 2 adults, 2 toddlers)
Ingredients:
3 Chicken Breasts (Or Pork Chops or any Combination of the 2)
1 Chopped Onion
1 Bottle of BBQ Sauce

Throw it all in a crockpot on low and cook til the Chicken's done, about 3 or 4 hours. Use 2 forks to shred the Chicken and Serve on Bread or Rolls.
Tip: Sometime the BBQ sauce will get too thin for my liking. When this happens I take the top off of the Crockpot for the last 30 mins and it'll thicken right up.


Italian Stew...or something. (Easily serves 4 adults, 2 toddlers)
2-3 Chicken Breasts or Italian Sausage
4 Cups of Chicken Broth or White Wine or Water
2 Cups frozen Spinach
1 Can of Butter Beans or Cannelini Beans
1 Can of Diced Tomatoes

Cook Chicken til almost done. Toss in medium soup pot. Add rest of ingredients. Cook til heated through and yummy. Sprinkle with Parmesan cheese if you'd like.


Humble Homemaking Words to Live By:
Proverbs 17:1
"Better a dry morsel with quiet than a house full of feasting with strife"


Wednesday, January 13, 2010

Another DIY- Do it Yourselfer. Dishwasher Detergent

The Dishwasher is quite possibly the most incredible kitchen appliance to ever have been invented. Know what else? I'd bet money that it was created by a Homemaker...or at least someone with children. My MIL (that's internet lingo for Mother In Law, incase ya didn't know) is 1 of 11; yes, ELEVEN children. Can you imagine cleaning up dinner dishes for that family? My husband's grandmother is a Saint, seriously. Me? Not likely to be cannonized anytime soon. The dishwasher keeps me sane. Pop in the grimey dishes at naptime and sit down with a cup of coffee and let the swishing sound of water and electronic brilliance doing your dirty work relax and sooth you. 45 Minutes later- VOILA! Someday somebody will invent something that loads and unloads that machine...mark my words. However one thing that isn't likely to be replaced anytime soon is Dishwasher Detergent. I personally have a problem with this. It's expensive and bad for the environment. So, yep, you guessed it. I'm going to "Stick it to the Man" as they say, and make my own :).


There are many recipes out there for Homemade Dishwasher Detergent...and I've tried many of them. I've had some pretty cruddy results with some of them and I've finally come to find one that works even better than my preferred store bought Palmolive Eco brand. Here's what you'll need:


Ingredients from Left to Right:


Citric Acid- This can be bought in most health food stores (Wegmans, for all you New Yorkers!). I buy it online because it's cheaper to buy in bulk. This prevents a cloudy residue from forming on your glasswear. Some people say you can substitude with 10-15 packages of Lemon KoolAid (the unsweatened kind in those small envelopes) but I haven't had much success with this. I got a cloudy film when I tried the substitute but some people swear by it!


Arm & Hammer Washing Soda: Not to be confused with BAKING Soda. Can be found in the Laundry section of the grocery store. Usually it's on the shelf near the Oxy Clean. You can also find this online if your local grocer doesn't carry it.


Borax: Also found in laundry section near Oxy Clean & can be bought online if necessary.


Kosher Salt: I'm thinking you can probably figure this one out on your own...


Recipe: 1 Cup Borax, 1 Cup Washing Soda, 1/4 Cup Citric Acid, 1/4 Cup Kosher Salt, Clean Dry 32 oz container (Ex: Empty Mayo jar, Empty Yogurt Container...)


Add 1 Cup of Borax


Add 1 Cup Washing SodaAdd 1/4 Cup Citric Acid Add 1/4 Cup of Kosher Salt:
Shake to Combine Ingredients and....

Miller Brand Dishwasher Detergent! Use 1 tablespoon per load.


So I'm sure you're all wondering. Why Bother? How much is this really going to save?


Well here's the breakdown for you...


1 72 oz bottle of Palmolive Eco Costs: $4.99 plus tax for about 30 loads = .16 cents per Load


Miller Brand:


Borax (76 oz Box): $4.51=> .40cents per batch


Washing Soda (55oz Box)= $3.57=> .48cents per batch


Citric Acid (16oz)= $5.47=> $1.15 per batch


Kosher Salt (48oz)= 1.99 => .08cents per batch


TOTAL: $2.11 per batch


Each batch is enough for about 50 loads and that equals .04 cents per load!


Well, I think that just about speaks for itself doesn't it?


Happy Savings my Fellow Frugalers


P.S. Another reason to make your own Dishwasher Detergent-
Most commercial brands contain Phosphates.
Excess phosphates are known to accelerate the natural aging of
lakes (eutrophication) and also present a serious pollution problem by
encouraging excessive growth of aquatic plants. They enter
waterways as runoff from agricultural lands as fertilizer and as human
and animal waste. The largest source of phosphorous entering the
environment is synthetic detergents which contain phosphate
compounds to soften water, increase the pH of water, and increase
surfactant efficiency. About 7.5 billion pounds of detergents were
used in the United States in 1991. This source accounts for over 2
billion pounds of phosphorus which is nearly half the phosphorous
entering our waters. Sodium tripolyphosphate (STPP) is most widely
used, and ordinary detergents may contain up to 50% of it by weight.
Automatic dishwasher detergents require high levels of STPP
because it effectively prevents water spotting during the drying
process.
As of 1992, 30 states, containing about half the population of the
U.S., have either limited or are considering limiting the use of
phosphates.


Moral of the Story: Purge of Phosphates, Save the Environment!

Wednesday, January 6, 2010

Spending too much Dough and other Bread musings.

We're a relatively small brood of 2 adults and 2 children ages 3 and under. Amazingly enough we go through AT LEAST 3 loaves of bread. Each. Week. Usually more like 4.
What can I say? Sandwiches are easy & accessable. My husband works on the road so he can't bring leftovers for lunch. Toast is a must with my morning coffee. Need a little something extra at dinner time? Bread and butter is our cure all.
So I got to thinkin'.
A good loaf of Wheat Bread costs anywhere from about $1.99 to $2.50 depending on the brand and the store. That means we're spending $5.97-$7.50 +tax per week...on BREAD! Ugh! I started thinking about ways to cut the cost of bread. $5.97-$7.50 per week may not seem like a lot to you...but that's $310.44-$390 per year! Anyway, I came up with 3 possible alternatives.
1. Limit Sandwiches in our Household
2. Buy White Bread
...Wait, no. That's just not going to happen. I haven't eaten White Bread since I was about 8 and my memories are not fond. Yuck.
3.?? Make Your Own.
Alright-Confession: I love to cook. I find comfort and solace in taking a few basic ingredients (or not so basic, depending on my mood), cooking them in a number of different ways (oohhh the possibilities!!), and the end result being all but Divine.
...Baking? Ehhh
Baking means Measuring. Baking means Chemistry. I HATE Chemistry. Unless your referring to a love scene from The Wedding Date, my favorite Chick Flick.
I DO, however, enjoy saving money. And so I embark on this journey of fickle yeast, gluten and ::shudders:: measuring cups. I'll be using the recipe for Wheat Bread from my Better Homes & Gardens cookbook (Thanks, Aunt Sharon!). Aunt Sharon gave me this cookbook for my wedding shower and it has been, and remains to be, my life preserver for all things Culinary ever since the commencement of marital, and subsequently, domestic life.
Attempt #1: Followed Instructions to a "T"...I swear! I even used measuring cups! The dough never actually proofed (baker talk for rising). I...decided to bake it anyway haha.
Outcome: Brickish.
Attempt #2: Same as above. Poor, Poor hubby. Hey...at least he'll get his fiber this week! :)Attempt #3: Ok, I went through the "Tips" section of BH&G. I read something about proofing the bread in your unheated oven with a bowl of hot water underneath. Like This:
The dough proofed a tiny bit...I think. Baked it....Bricked it.
Attempt #4: I enlisted the help of a veteran Bread Baker for this one. She suggested activating the yeast in a small bowl with 1c. of warm water and a tablespoon of sugar. If it foams up in 5 minutes...all systems are a go. If not, it's bad yeast. Well I got foam! So I proofed it in the oven just like BH&G said. IT PROOFED! Majorly. It was wonderful! So I proceded on with my dough. It says to let it proof again for 45mins after you put it in the bread pans. It was going along so well. It was rising to almost double it's original size.
and then we got some turbulence. In other words, my 2 year old ran through the kitchen like a heard of elephants. This burst my little bread bubble as I looked in on the bread just in time to see the bread deflate as a result of said turbulence. This is what happened:


...it's got wrinkles :(. However, with hopes high, I decide to bake it anyway. *Hoping* that maybe it'll rise again while it bakes. I'm a sucker for high hopes. This is what it looked like after baking.Flat and Brickish.

And so...I'll bid my bread making aspirations adieu for now. I will not give up though! After doing some calculations I found that baking your own loaf of bread would cost approximately $1.20. That's $3.60 per week for 3 loaves of bread. That'll save about $2.37-$3.90 per week or $123-$202 per year!

As for the bricks...

Bread Pudding!
and Caramel Sauce!


Until next time...


Tuesday, January 5, 2010

Simple Beginnings!


Welcome to The Humble Homemaker!


This will be a place of, yep- you guessed it!


Homemaking.


Cooking, Cleaning, Children, Baking, Frugal Living (my personal fave). All on a modest Budget


I look forward to sharing tips and receiving feedback from you all on this journey.


Home is where your Story Begins!


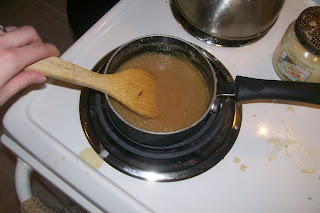
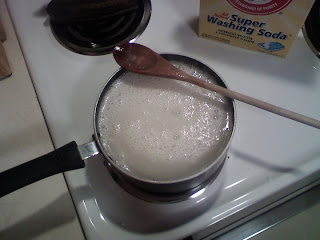
Simple Beginnings...and I do mean Simple!